 |
Tree Measuring Guidelines
|
|
Tree Measuring Guidelines
|
The Eastern Native Tree Society is a diverse, non-profit group of ecologists, educators, naturalists, and world-renowned canopy researchers dedicated to a better understanding our Eastern forests. Accuracy is the premise of our mission, and ENTS has developed research techniques unmatched by any other institution. Champion trees are a spin-off of our research, and this handout describes our measuring guidelines.
The Eastern Native Tree Society (ENTS) has developed and tested standardized techniques for tree measurements. The ENTS techniques generally follow champion tree guidelines and the results of ENTS measured trees can be submitted to most champion tree lists with no conversions. The most significant difference between ENTS measured trees and those measured via conventional forestry methods is a much higher standard of accuracy. In fact, the “ENTS method” of laser-based tree height measurements is so accurate that it is being employed in height growth monitoring projects by several universities and premier forest ecologists. Perhaps the most important value of the ENTS method is that it is repeatable, a basic premise of any scientific project. Users of the method, with a few minutes of training, can produce measured results within 1% or less of a seasoned ENTS researcher. Seasoned ENTS researchers can measure a tree from the ground to within inches of a direct tape drop. This process takes but a few minutes for most trees. See Figure 4 on page 11 for a discussion of this method.
This handout will discuss the basic premises and assumptions of how to measure a tree and discusses in detail several ways to do it. I will start with the easiest dimensions to obtain- girth and crown spread.
NOTE: This is a draft document and is the sole property of Will Blozan and the Eastern Native Tree Society. Unauthorized copies and distributions are forbidden.
For permission to use this document please contact me at:
Will Blozan, President
Eastern Native Tree Society
| Girth is a dimension taken at a point 4.5 feet (BH) above average soil level (A). This measurement is called circumference at breast height (CBH). If a burl or other atypical growth formation is encountered at this point the least distorted girth below this point is used (B); otherwise above BH. When a tree is growing on a slope the girth is taken at a point that is the average of the highest point and the lowest point the tree trunk appears to contact the soil (Mid-slope-C). This mid-slope rule is used to follow the American Forests guidelines for measuring champion trees. In all cases the girth is taken perpendicular to the axis of the trunk at BH, not parallel to the soil. Measured girth is the best approximation of size, since it is a real number, not a calculation based on fictional premises. Even girth has its limitations, as a sinewy or contorted trunk will have lots of hollows and ridges that are not accounted for in the measurement. Diameters calculated from such trees will be overstated (diameter= CBH/ 3.142). For volume measurements, “footprint” maps must be obtained to calculate the “functional” diameter and girth. The functional diameter is always smaller than the calculated diameter. |  |
Figure 1. Girth measurement locations

When most people ask how big a tree is they want to know the diameter, not the girth. Diameter is useful to calculate since it is an attribute readily understood by most people. It also seems to be one of the most overstated dimensions other than height, with many “5-6 foot diameter” trees being closer to 3-4 feet in actual diameter. Lack of an accurate reference is often to blame, as is in the case of overstated heights.
Average crown spread is obtained by measuring the longest and shortest extent of the crown and averaging the figures. Crown spread is taken independent of trunk position. I measure to the tips of the limbs, not to “notches” in the crown shape. Try for a ninety-degree difference in measuring location.
Figure 2. Measuring crown spread
Average crown spread= (longest + shortest)/2
When measuring crown spread on steep slopes (>15 degrees), it is important to correct the slope distance to horizontal distance to avoid exaggeration. This can easily be accomplished by taking the COSINE function of the angle of the slope in degrees and multiplying it by the slope distance.
Another method is the “Spoke Method”. Ten or more measurements are taken from the midpoint of the trunk to the outer extremities of the crown. These are averaged and the result is the average crown spread. This is the preferred method of canopy researchers and is probably the most accurate, and can be used to quantify crown area. On large trees it can be accomplished quickly with a laser rangefinder. The increased accuracy is largely overkill for champion tree registers, and slope correction can get tedious to say the least!
2 (SUM/n) = Average crown spread
Lasered crown spreads
The use of a laser rangefinder can really speed things up when measuring crown spread. The laser can also be used to measure crown spread on tree canopies over an obstacle such as those described below. As in measuring tree height, several points on the tree can be “explored” to find the furthest point. Simply use the formula described below in Figure 3. In the illustration below, the observer is directly under the opposing crown edge, but multiple triangles can be used or combined with ground-based measurements as in figure 3b.
Figure 3a. Measuring challenging crown spreads with a laser rangefinder
Crown spread= Distance 1 *COS (A1)
Figure 3b.
Spread= D1+D2
| Getting an accurate tree height is the nemesis of many potential tree hunters, and the leading source of point errors on champion tree lists. Although the techniques are very simple, employing them accurately is another story, which will be dealt with later in this section. Tree heights are typically remotely obtained using a clinometer or transit for angles and a measuring tape or infrared laser rangefinder for distance. By using simple trigonometry and laws of similar triangles and right triangles, the true height of a tree can be easily obtained. In all cases, the height obtained is the vertical distance between the top and base, not trunk length. Leaning trees and hardwoods have longer trunk and branch systems than indicated by vertical height, but is beyond the scope of my efforts or champion tree lists to measure. |  |
Non-laser techniques i.e. Cross-triangulation
Huh? News Flash! The top of a tree is never directly over the base. This assumption is the fatal flaw of conventional forestry height measuring techniques. We all have been taught to measure out 100 feet from the base of the tree, take an angle reading with a clinometer and multiply the result by 100 to get the tree height. Some forestry clinometers are calibrated in “chains” (66’), and work similarly. These techniques do work, but only on trees that have ALL of the following conditions satisfied:
 |
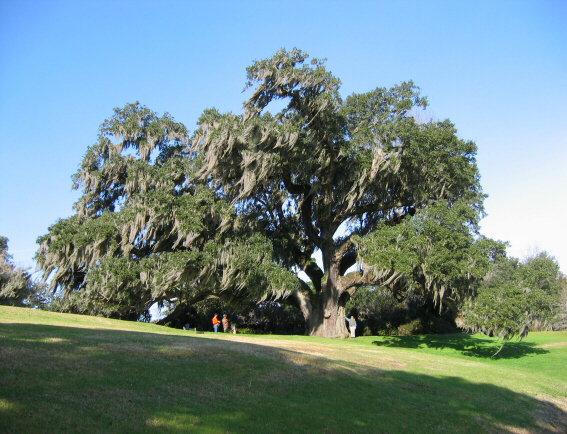
· The highest point of the tree is directly over the base of the tree · The highest point of the tree is clearly visible · The tree is growing on level ground · The tree does not lean How often does this happen? Not very often! Aside from perhaps a Norway spruce growing in a level parking lot, most trees do not ordinarily satisfy all of the above conditions. Older trees and trees in old-growth forests do not typically grow straight or have a well-defined top when viewed from our limiting terrestrial level. I have climbed many tall conifers and performed tape drops (vertical) from the highest point to the ground. The tape has never come down on the base. Ten feet or more is a common displacement from vertical on large conifers. Hardwoods can be much more. In fact, live oaks and other wide spreading trees can have tops more than 40 feet off the base. Consider the photo below of the Middleton Oak in Charleston, SC. |
Where do you begin? Is what appears to be the highest point really the tallest part of the tree? A huge tree like the Middleton Oak is a challenge to measure, and lots of time will be spent chasing false leads and finding nested tops. For example, the highest point of the tree above is actually a small triangle shape “peeking” though the window of sky formed under what appears to be the highest part in the photo. It is fully 35 feet off the base and on the other side of the tree!
OK, back to cross-triangulation. Cross-triangulation is essentially the process to map a point on the tree (the top) in three dimensions. Once we know where the top is, we can then properly measure its position relative to the ground (height). In a two dimensional photo like the one above, there is no way of knowing for sure which part of the tree is far back and which is closest. In cross-triangulation, you pick a target point. Dangling your clinometer (or plumb-bob) by the lanyard, you transpose the point to the ground (a helper is useful). Mark this point with a stick or other object. Go ahead and measure the angle to the top while you are there. This is the point in one dimension that the top intersects the ground, and is in a sense the “X” axis. Then, observing the same point with your eyes, go 90 degrees to either side and transpose the top to the ground again. This is the “Y” position on the “X” axis that the top resides. Move the stick to that position, staying 90 degrees (perpendicular) to the line of sight. It is often helpful to lay the measuring tape out on the first sighting so that you can more easily find the 90 degree mark, and when you move the stick to the “Y” position you can modify the distance and calculate the height. The stick’s position is the adjusted baseline.
Figure 4. Cross-triangulating a leaning tree
On some trees this is a very difficult and time intensive procedure to accomplish, and if you are going to measure a lot of trees or trees in a forested setting, I encourage you to skip this method, buy a laser rangefinder and go to the section on page 11 on the ENTS Method. Regardless, cross-triangulation is good to know, as it illustrates the fallacy and pitfalls of conventional techniques, and when your laser battery dies or you forget your equipment, you can fall back on it. When properly applied, the results of cross-triangulation are extremely accurate. Its biggest drawback is TIME!
Side note: I must point out that within the Eastern Native Tree Society and many universities cross-triangulation techniques are no longer being used. This is because once you get familiar with using a laser rangefinder; you basically can’t imagine doing it any other way. The technique is so accurate, quick, and foolproof that its introduction into scientific canopy studies was a “no-brainer”. Height growth of mere inches can be ascertained with the techniques described after this section on conventional forestry methods.
The following diagrams explore the formulas and scenarios associated with tape and clinometer measuring techniques, AFTER cross-triangulation has been performed and the highest or targeted point has been identified.
Figure 5. General formulas and techniques for measuring tree heights.
Height= H1+H2, where: H1= B*TAN (A1) and H2= B *TAN (A2)
Ideal parameters rarely occur in nature, and situations critical to accuracy are often overlooked or not considered, thus making many claims of tree height inaccurate and unacceptable. See the figures below for an illustration of common sources of tree height errors.
Figure 6. Common sources of height errors on leaning trees
In Figure 6, the tops are leaning towards the observer, and it is necessary to cross- triangulate the actual top projection to the soil (the point directly under the highest point). From this point a separate baseline for the top measurement is taken, otherwise the height will be exaggerated (or underestimated on a tree leaning away from the observer). Without correcting for the lean and the true top location, even small trees can yield enough error (i.e. point spread) to keep co-champions away (6 points).
The slope distance of a line between the observer and the tree (B1) is longer than the same horizontal distance (B2) between the same points. Since conventional height calculations are based on the horizontal distance between the observer and the tree, the distance must be corrected to the horizontal equivalent. This is very easy, and even easier to forget to do!
Figure 7. Correcting the baseline for trees growing on a slope
Horizontal distance B2 = B1*COS (A1)
All of the above situations (i.e. a leaning tree and leaning ground) can compound themselves into massive height errors. Such compounded errors can be highly significant on small trees as well as on trees that don’t appear to be leaning much. Naturally, the observer can often position themselves in such a way as to minimize the potential for having to correct for compounding errors. Such tactics include selecting a sighting position perpendicular to the lean and sighting from a point level with the base. Here is an example of a calculation you may need to use to avoid compounding errors:
H1= [TAN (A1)]*[B1*(COS a1)] +/- H2= [TAN (A2)*B2*(COSa2)]
H1= Height above eye
H2= Height below eye
A1= Angle to top
a1= Slope angle of baseline for top
A2= Angle to base from observer
a2= Slope angle of baseline for base
B1= Sloped baseline distance for top
B2= Sloped baseline distance to base
NOTE: Absolutely none of the challenges associated with cross-triangulations are an issue when using the ENTS laser method.
If the above figures and techniques are mind-boggling, then buy a laser and try this! This low-cost method has the advantage of being the quickest, simplest, and most accurate. A clinometer and a laser rangefinder is a relatively minor expense (<$300) and easily justified by the speed, accuracy, and foremost, the REPEATABILITY of your results!
The laser rangefinder is a device that sends out a pulse of infrared laser light. This light reflects off a target and bounces back to the laser unit. A clock inside times the bounce and calculates the distance based on elapsed time. Since the laser requires a return bounce, this method has the distinct advantage of automatically measuring a physical part of the tree, as opposed to an extrapolation of a part of the tree via cross-triangulation or conventional methods.
Only four numbers are needed to complete the tree height calculation, and no tape is necessary, nor is direct contact with the tree. This last bonus can be useful for trees across a river, road, a mean dog lair or other obstacle. When searching for champions, a quick height reading will tell you if further exploration and contact with the tree, the dog or its owner are necessary. Since the hypotenuse of the triangle is the baseline and it is measured from a physical part of the tree any lean or slope correction is irrelevant. You are simply creating two right triangles to an imaginary (but fully real) level plane (eye-level or tripod, etc.) that is the base of the top triangle and the top of the lower triangle.
Figure 8: The “ENTS Method”

Total tree height= H1+H2, where H1= [(SIN) A1*D1] and H2= [(SIN) A2*D2]
<<< THAT’S IT!!! >>>
What can I do if…
· I can see the base but can’t get a laser bounce?
Shoot the distance level on the trunk, and use the TANGENT of the angle to the base instead of SINE. Only useful on shallow angles and non-leaning trunks.
· I am not sure I am getting a bounce off a certain part of the tree?
Fire the beam into the sky behind the target. Slowly move the sight towards the target until you get a hit. The laser will not read anything when it “misses”.
· I have a great shot of the top and base, but from different locations?
Shoot them from the best locations and reference the triangles to a common point easily seen from both sites, i.e. lowest branch, a burl, or bend in the trunk. Create two triangles from the two (or more) locations and add the results.
Figure 9. Using a reference point to create triangles from two positions
· I can see the top and/or base but the laser bounces are from branches of other trees?
If practical, back up from the tree far enough that you can put the laser into a filtering mode, such as “rain”. This will allow it to ignore the clutter under a certain yardage and give the reading to the tree only. Use a reflector on the base.
· I can almost get a laser return through underbrush, or the distance seems
short?
First, verify the distance’s plausibility by shooting an unobscured portion of the trunk close to the base. Place a reflective material, (white paper, bicycle reflector) on the trunk to get a strong laser bounce. Reflectors are excellent!
· I have an excellent shot just beside the trunk, but not on it?
Have an assistant stand or hold a reflective object perpendicular to the center of the trunk, and level with the base or a known height relative to the trunk.
Some more helpful laser advantages
When measuring from a level, common substrate as in a boardwalk in a swamp, a canoe, a field or an observation deck, one base height can be determined and the rest of the tree heights shot at will and added to it.
You can measure as many trees as you can see from one point, useful for “exploiting” good vistas from a trail or other prime vantage point in the forest.
· The laser only reads in .5 to 1 yard (or meter) increments, how can it be so accurate?
Before you use a new laser, it must be calibrated. To do this, stretch out a long measuring tape flat on the ground. Have an assistant stand at various locations on the tape with a reflective target. Place yourself in a position so the eyepiece of the laser is over the “0” mark on the tape. Alternately, you can do this by yourself by affixing the “0” end to a reflective target and walking down the tape, shooting back at the target and noting your position at click-over. Shoot a known distance; say to 40 yards (or meters). Have the assistant move the target closer or away from you until you get to the “click-over”, or inflection point of the laser for 40 yards (or meters). Note where the target is in relation to the tape. Do this calibration over a wide range of distances to see the variation and correction factor to use (if needed). For example, if the laser reads 40 yards at a distance of 40.6 yards based on the measuring tape, then you would use that figure when your laser gives the click-over reading for 40 yards. By calibrating your laser, you can actually be mere inches off in the distance measuring part of the tree height.
· How do I explore the crown architecture?
“Skate” the laser over the surface of the crown and in “nested” pockets and places you may not expect a high part to be. The highest point may be well below what appears to be the tallest part. Look for the farthest distance first, then the highest angles with far readings. Once you become familiar with a species and its architecture, you will know how to narrow your search down.
· What if the tree I am measuring has multiple stems?
Measure the attributes of the target stem only. Do not include the crowns or heights of the other sprouts.
· What is a multi-stemmed tree?
The definition of a multi-stemmed tree can vary from one person to another. I am a purist, so my definition may seem extreme, but we need to start somewhere. To me, the entire point of a champion tree list and the ENTS research is to assess the capabilities of the eastern species. The best way to assess this is to study individual stems or trees of the species. By focusing on individuals we can accurately assess the potential and find benchmarks for restoration efforts or whatever the goal may be. To me, a champion tree is one that represents the best development of an individual, and therefore I do not include multi-stemmed trees in my research or nominations. Many will argue that a clump of sprouts fused into a huge trunk that originates from one root system is a single tree. I would agree, but it is not a single stem and thus does not represent the potential of an individual. Although the conglomeration may be of identical genetic material or was planted by the owner from a single pot, it is a collective effort, not that of an individual. I know of fused examples of tuliptree, white basswood and eastern hemlock that would redefine the National Champions for the species, but I have not nominated them simply because they are not individual stems.
Some ENTS members use the “slice test”. Basically, if the tree was cut at 4.5 feet above the ground, would the tree hold together? I have trouble with this, as a tree that would fail one year would pass the next. I think of it more as a “pith test”. If the tree has more than one pith at ground level it is a multiple-stemmed tree. Note I did not say 4.5 feet above the ground. This is because the 4.5 foot height is a forestry standard and is an arbitrary and convenient place for most people to measure a tree. Some trees, like flowering dogwood or rhododendrons, may branch well below 4.5 feet but have a single pith at ground level. In the case of such trees, I would measure the narrowest point below the lowest fork. All trees do not conform to our set standards, but we can always set new ones!
What about shooting straight up?
The laser is calibrated in .5-1 yard increments, and shooting straight up seems to be a logical way to at least rough-out a trees height. This is true, and shooting straight up is in fact a fully legitimate and appropriate method to measure a tree that has a crown conducive to it. Dense conifers and fully leaved hardwoods are impossible to measure this way, but hardwoods in winter are typically fine. Some trees, such as oaks and sycamore are easy to measure by this method during early leaf-out. Careful exploration of the canopy is necessary to find the highest point. Figures obtained from straight-up shots are usually recorded as “NLT”- “not-less-than”. I use this technique to help determine if more careful searching is needed or to find the highest leader for more detailed measurements.
Since a straight line leaning 11 degrees off vertical is still over 98% of vertical length, this technique gives you a full 40' circle of exploration on a 100' tree from one spot. Figures obtained by shooting straight up are seldom less than one foot different than the two triangle ENTS technique (often listed as SIN+SIN) described above. All you need to do is find the inflection or click-over point and sight the level point on the trunk and add it to the laser reading. See Figure 9 below:
Figure 10: Exploring the crown by shooting straight up
Conclusion
It is the inaccurate figures and resulting false claims that concern us as much, if not more than, the inability to put an accurately measured tree on any champion tree register. The types of measurement errors discussed here are exceedingly common, and equally overlooked. Many ancient forest trees certainly exceed the false heights of some of the open-grown trees that have been incorrectly measured. This is significant in the sense that it does not give justice to the accurately measured trees and their measurers, but the inaccurate numbers misrepresent the true nature of the species and confound conservation efforts.
Of the several champion trees nominated by other tree hunters that I have remeasured, only three even came close to the true height of the tree. In all other cases, the error on the height alone added enough points to exclude a challenger from co-champion status. Some trees have had height errors exceeding 35 percent of true height, which in some cases added dozens of points. The height errors were due to the application of inaccurate techniques and unverified assumptions. In all cases the trees were leaning or had a wide spreading crown.
For more information, please visit the ENTS website:
http://www.nativetreesociety.org/